Hexagons - Revisited Part One
 |
| More about these quilts later. |
(Note: All dimensions refer to the finished size.)
That is the way my drafting and design background taught me to think. I referred to the first measurement as point to point and the second one as across the flats.
The quilting world views things a bit differently. If you would order a 1" Hexagon stamp, template or die cut, you would probably get this:
The 1" measurement would refer to the length of each side. The hexagons are the same in all the pictures above. So you can see that although you are thinking a 1" hexagon is small, it really isn't, as it is actually 2" from point to point. Whew. Hope that clears it up, once and for all. Just be sure to pay attention to the way the manufacturer of any hexagon product measures, and you will get what you expected to get.
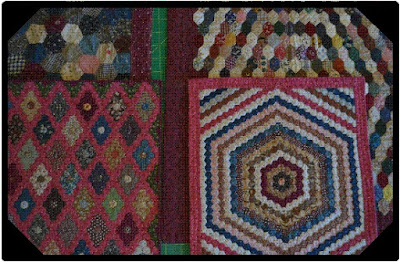
There are many different methods of making a hexagon quilt. I used to think that English Paper Piecing was a waste of time. Yes, some of you out there are probably yelling at me about now. My way of thinking was that basting all the way around each piece and then sewing them together was akin to making two quilts. It was like sewing everything twice. Also, after trying EPP for miniatures, I found it was much easier for me personally to just mark the sewing line and the cutting line, cut them out and then sew them together. That is how I have made both the miniatures shown in the opening photo. I did, however, EPP the doll quilt in the opening photo. It is made up of elongated hexagons.
The last quilt in the opening photo is an antique doll quilt and it is my guess that it was hand pieced and not paper pieced.
It is my belief that quilters should try every method available. You never know what will work for you until you try it. For the first method, let's just talk about plain old hand piecing. If you follow my blog, you know that all my miniatures are hand pieced, hand needle turn appliqued and hand quilted. For hand piecing, I am a proponent of marking both the cutting and the sewing lines. Quilters that have gone before us, used to just mark the sewing line of hexagons and then eye-ball the seam allowance when they cut them out. That doesn't appeal to me, although those quilters turned out lovely quilts in many cases. My eye-balling technique is not that accurate. So, how do you mark both the lines without taking forever to do it?
One way is to use your computer. You can not do anything as accurately as a computer can. I drew a sheet of hexagons in my computer. They were drawn with the cutting line and the sewing lines depicted.
It was like the above drawing, except it was an 8.5" x 11 sheet. Then I ironed freezer paper onto the right side of my fabric and printed out sheets of hexagons onto the wrong side of the fabric, using my home ink jet printer. Then I cut them out and sewed them together. Simple as that. Inklingo is a company that specializes in this sort of thing. I have never used any of their products, as they weren't around when the above quilt was made. (Or if they were, I didn't know it.) I always just printed out my own stuff. What the ink will do to the fabrics in 100 years is unknown. This quilt was washed several times in the washing machine (big gasp out there) until the water was clear. Just for the record, I would never advise anyone else to wash their quilt in the machine, but I suspect that I am not the only one who has done it in the past. Despite the ink and the washing, this quilt will undoubtedly last as long as I will. Anyway, if this is something you think you are interested in, visit Inklingo and spend some time there. They have some freebies and lots of information for printing on fabric. Also, you can print onto freezer paper and go that route, if you chose. (This is not a method I have used, but some quilters like it.) Be sure and download their free idea booklet for lots of design info.
Well, that's about it for part one of Hexagons - Revisited. More methods to come in future posts. Let me know if you have questions.
Till next time............
Sheila


Comments