Anatomy of a Frame Quilt
Thought you might want to see a little of the process. Here we go:
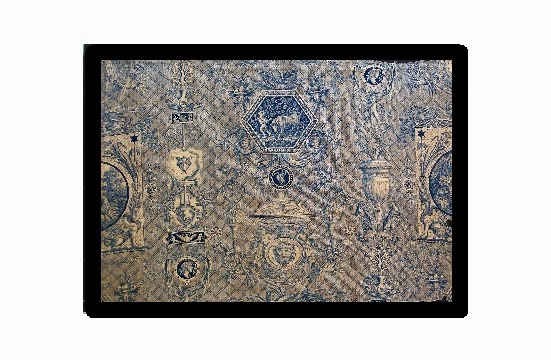
Above is a photo of a piece of antique toile that I have. (Please ignore all the wrinkles, if you can!) It is a monochromatic pictorial cotton. It was made at the Oberkampf Factory in France in 1806, and
was designed by Jean-Baptist Huet. In those days if you were rich and lived nearby in Versailles, you ordered all your toile from this factory. The detail on this piece is incredible and the more you look, the more you see. (You can see more of Huet's work on line at the Metropolitan Museum of Art.) These types of designs were printed in long panels and were used for bed curtains, window curtains, and other home (palace) decorating. I have two pieces that someone had made into pillow covers. My husband spotted them at an antique show in Nashville, TN. Anyway, I am getting ready to cut into them to make a miniature and wanted you to see them first. I am going to try to use only one panel and save the other one intact. We will see how that goes.
You have to start somewhere, and here is the beginning of my Miniature Medallion Quilt:

My first border:

I chose to do an applique scallop for the first border. The center toile piece was not the same height and width and squaring it up will make future borders easier and symmetrical. The cardstock pattern is on the left, with one side cut off to use as a marking pattern. I use a Pigma Micron no. 5 Pen for marking the turn line. All the applique I do is needle turn. Also, the complete pattern is marked on the background fabric with a pencil, although you may not be able to see it. The fabric diamond is from the late 1700's or early 1800's. It is very old and I am lucky to have it.

There are still basting threads in all the motifs, so they may look a bit odd. I thought the center needed more, plus I wanted to feature more of the toile. It is not easy to incorporate large scale prints or pictorial motifs into a miniature. It is a big challenge for a small quilt. The floral fabric is a stripe cut from a diamond that was used in the same quilt as the tan diamond that was used in the first border. (Note: this border actually disintegrated while I was quilting it. The center was already quilted at that time, so I had to pick the quilting out of the border, remove the floral border, and applique another border in its place. The fabric is plain and was disappointing after the tiny floral border, but it is all I had to use. People have asked me why I would try and use fragile fabrics. There are a couple of reasons - 1. I don't have that much early 1800's fabrics laying around and 2. Sometimes you want the quilt to look not only antique, but used.)

The next border is appliqued tear drops. The one after that is hourglass blocks. The next one is pieced diamonds that give a zig-zag look. This is followed by a larger hourglass border. What appears to be the last border is actually three: 1)a narrow plain border 2) squares on point and 3) another narrow border. It gives the appearance of one large border. Whew.
O.k., let's just skip to the finished product. Here is the finished quilt. It is one of the hardest I have ever done. The backing is a late 1700's plain fabric that was saved from the backing on a disintegrating quilt. It is the same as the center background. Although I prefer a separate binding, this is finished with a knife edge (which is keeping with the time frame) and is due to the fact that I didn't have any appropriate fabric with which to bind it. It is 19.25" square.

It has been done for quite some time, but to tell the truth, I was so sick of it, I didn't post it! I learned a lot during the making of this quilt. I would like to go back and do a better job, but it is done. It is what it is.
Till next time...
Sheila


Comments